top of page
EXPERIENCE, LOVE, CREATE ART

COSPLAY AND CRAFTS
Moon Knight Cosplay

FEATURED:
MOON KNIGHT COSPLAY
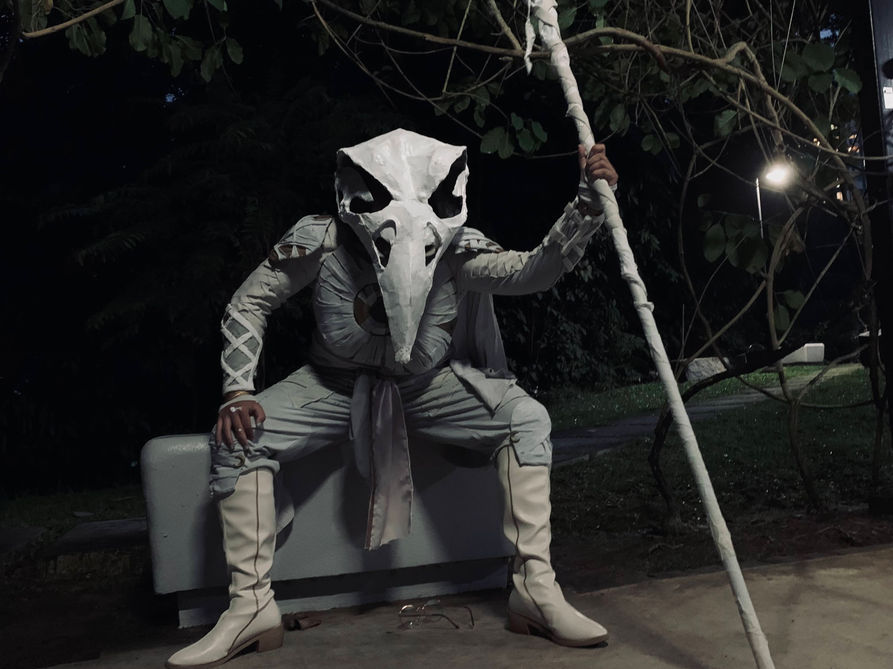
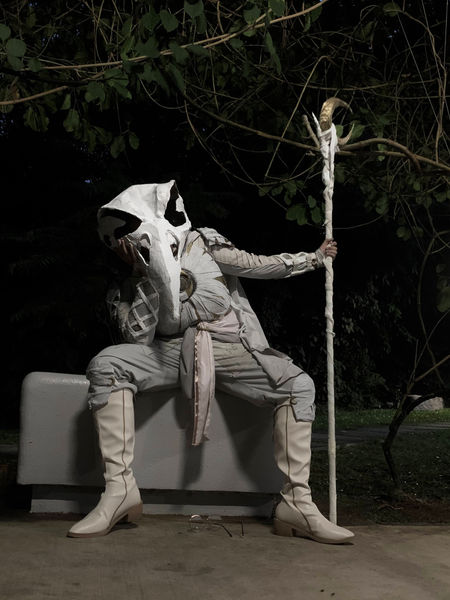
Originally made solely for my Halloween Party, this handmade Moon Knight costume eventually made it to the Cosplay Competition Finals at Singapore Comic Con 2023. It took 1 and a half months to make, with recycled materials, spray paint, EVA foam and clay.


HOW IT'S MADE
This was my first time doing cosplay! For this project, I learnt how to make handmade armour from YouTube, by casting myself with clingwrap and duct tape, then cutting, gluing, shaping and painting some cheap EVA foam from the bookstore.

CHESTPLATE
Made with cardboard, EVA foam and decorated with strips of cloth from an unwanted Tshirt, this chestplate is the centrepiece of the Moon Knight costume, bearing the signature crescent boomerang which Marc Spector uses.
To get the shape of the main breastplate, I wrapped my body in cling wrap, then taped the area I wanted to cover with duct tape. I then drew the armour piece template on while looking at the mirror, cut off the cast, then traced the contours onto recycled cardboard box. To give it that metallic finish, I coated the whole piece with EVA foam and spray painted it with gold spray paint.
I then added some cardboard pieces for extra detail, then wrapped and glued strips of recycled cloth from the centre outwards. Finally, I made the crescent by bending some cardstock into a 3D crescent shape, coating it with EVA foam and seaming it with foam clay. Then using a soldering iron, I detailed abstract hieroglyphic patterns onto the side, then finally spray painted it down.
ARM BRACES
These braces kickstarted the project. Using the same method to create the chestplate, I created the template for my forearms but such that I could attach and detach it easily from my body. Initially, I added magnet clasps underneath the braces, but they ended up detaching easily especially after wearing the inner suit. After several trials, I ended up with elastic velcro straps, so that I could wrap them around my arms easily even with the inner suit on.
For the detailing, I got some cheap linen cloth from a dollar store then cut them up into roughly equal-width strips. While referring to the official Moon Knight poster, I carefully weaved each piece once on my desk to get the overall pattern down, then repeated the weaving over the armour piece and finally glued the pieces down. This part was especially finnicky because lots of fibres had already started coming apart. Eventually, I glued some of the fibres back in place with fabric Mod Podge, but left the remaining ones loose to add to that rugged Mummy effect.
For final details, I added wrapped white felt strips for the outer weave, and sculpted small crescent moons which I spray painted then stuffed into one of the grooves. The wrist cuffs were made in the end, using the same technique I used for the other armour pieces.


SHOULDER PAD
This is the only piece of armour that required more soldering work. While the original costume probably didn't have visbile details, I had already busted out the soldering iron and wanted to add more details to the costume. Hence I added extra layers of EVA foam, weathered it down with the iron, and finished the tips with abstract hieroglyphs.
To attach this piece to the suit, I wanted to use magnets at first but quickly realised it would fall off easily. I eventually ended up pasting a velcro strip to its back, and glued another corresponding velcro strip to the shoulders of the inner shirt. When suiting up, I could then quickly paste it onto my shoulders without worrying about it falling off easily.
HOOD
This was the most difficult part of the costume - having to sew a whole cape from scratch. For this, I bought separate types of fabric, mostly because I miscalculated how much I needed. For the hood, I traced an existing hoodie for a template, then sewed the pieces on a sewing machine, with my aunt's guidance. I'm only used to hand sewing, so sometimes she had to take over when the stitches starting getting out of hand. Before sewing the 2 sides of the hood together, I sandwiched in a crescent moon cut from EVA foam and glued it down.
Eventually I got the hang of it, and sewed the strips of linen along the sides of the hood for extra detail. Once the hood and cape were attached, I trimmed the sides of the cape to (make the whole cape look like a crescent moon when spread open), then finally dyed the whole piece in a bucket of grey fabric paint diluted with water.


KHONSHU'S HEAD
Khonshu's head and staff were last-minute additions. In the TV series, Marc Spector is forced by Khonshu to do his bidding, in return for the protection he gives him. In that sense, he is controlled and haunted by him constantly. Hence, I thought it would be cool to pay homage to a panel in the Marvel Comics where all three of Marc Spector's personalities finally stand up to Khonshu when they say, "We are Moon Knight, and we never needed you." as they crush his skull, by performing on stage with his skull and staff almost as if they were trophies.
As I am a trained 3D modeler, it was really easy to visualise a 3D pigeon head using limited photo references, then translating that into individual pieces that would be stuck together later. After forming the base shape, I then added more tape to pinch some parts together or add volume. I then added paper mache, foam clay details and finished it off with acrylic paints.
KHONSHU'S STAFF
The staff is where I could exercise most creativity - since you can't really see his staff in great detail, I could essentially use whatever pattern I wanted.
For the staff, I bought the longest pole typically used to hang clothes (or galah in Malay), then fashioned a large 3D crescent moon from cardstock paper. I tightly sealed the moon to the pole with lots of duct tape, covered it in EVA foam, then used foam clay to slowly add finer details. As the remaining clay I had was not as pliable as I'd have liked, I just used my thumb to smear blobs of clay along the moon, creating small grooves until it looked intricate enough.
I had run out of spray paint too, so I had to manually achieve a metallic effect by using some cheap leftover pearlescent acrylic paint and dark brown paint for detailing along the grooves. Finally, I covered the whole pole in bandages.


GALLERY


HANDICRAFTS
Cosplay has just been a very recent hobby, whereas I've been crafting all sorts of knick-knacks all my life! From sewing to sculpting, I've made lots of highly personalised gifts for friends and families from recycled materials and basic art supplies.
HANDICRAFTS


SHOP COMING SOON
See anything you like or wanna feel like your favourite character? I'll be opening a merch shop + commissions soon so keep a lookout!
bottom of page


